
Friday, December 25, 2015
BIG NEWS!
At last! Sir Harry Ricardo's classic text is back in print. No longer does one have to pony up hundreds of dollars for a copy of this must have text (even though it's a bargain at those prices).

Tuesday, May 5, 2015
R1200GS Major Service
This 2006 R1200GS has 60 thousand miles on the clock and is in for a major service, input spline lube and general going-over. The bike is equipped with BMW's Servo-Assisted ABS which will also be serviced with new fluid since the fluid has never been changed.
So far, with the exception of the output shaft seal and a cracked swingarm boot, everything looks OK.


The clutch hub and input shaft splines are in good shape.


Oil leaking past the output shaft seal.

So far, with the exception of the output shaft seal and a cracked swingarm boot, everything looks OK.
The clutch hub and input shaft splines are in good shape.
Oil leaking past the output shaft seal.
1966 Honda CB160
Isn't this the cheekiest thing you've seen in a while? It's a 1966 Honda CB160 that has been in the same family since new. The finish is completely original, as is almost everything else about the bike.
At some point the front fender was changed for a chromed part from a Kawasaki and the mufflers were swapped for reasons unknown. The owner (the original owner's grandson) is currently searching for the correct fender and mufflers and intends to keep the bike so that he can pass it along.

It has been sitting in indoor storage since 1983 and so needs some attention to get it running and running well.

The owner had already installed a new battery but the bike wasn't running right. In this kind of situation (as in any other), being methodical pays off. So, in order, here is what was done to get this bike back to its intended mission of making its owner smile.
Engine:
- Removed the plugs and made certain that the engine spins freely
- Set intake and exhaust valve clearances
- Perform compression test
- Verify engine oil level
Ignition System:
- Verify battery voltage
- Clean breaker points and set proper gap
- Verify auto advance functions freely
- Set ignition timing (statically, using a test light)
- Clean spark plugs and set proper gap
- Visually verify spark at the plugs
Fuel System:
- Drain all old fuel
- Replace all rubber lines
- Disassemble and clean/inspect carburetors
It was in the fuel system, specifically the carburetors, that age-related deterioration showed itself.
The floats in these old Hondas were fabricated from brass sheet and soft-soldered together. The float's function is to control the inlet valve in the carburetor. When the fuel level in the carb bowl drops, the float also drops with it, thus opening the inlet valve and allowing fuel into the bowl. The float then rises and closes the inlet valve when the fuel level reaches the proper height.
Here we can see the effects of surface corrosion on the floats. The brass is very thin originally and it doesn't take much for corrosion to cause perforation, allowing fuel to enter the float and negating its ability to actually float. The corroded areas pushed right through with the lightest touch of an X-acto knife. Needless to say, these parts were replaced with new, OEM parts (still available).


 The carbs were cleaned and reassembled, the new floats installed and set to their proper height and the carbs were then reinstalled with new fuel lines.
The bike started with no trouble and the idle speed and idle mixture were set once warmed up. The final step was to synchronize the throttles so that the slides lift at the same time.
Some other minor "repairs" had to be corrected, such as the brake light switch's attachment to the pedal (rusty wire won't do)...


...and the choke linkage (more rusty wire).


The air filter hardware was also replaced with the correct type. The little Honda runs like a champ and will no doubt continue to do so for quite a while longer.
At some point the front fender was changed for a chromed part from a Kawasaki and the mufflers were swapped for reasons unknown. The owner (the original owner's grandson) is currently searching for the correct fender and mufflers and intends to keep the bike so that he can pass it along.
It has been sitting in indoor storage since 1983 and so needs some attention to get it running and running well.
The owner had already installed a new battery but the bike wasn't running right. In this kind of situation (as in any other), being methodical pays off. So, in order, here is what was done to get this bike back to its intended mission of making its owner smile.
Engine:
- Removed the plugs and made certain that the engine spins freely
- Set intake and exhaust valve clearances
- Perform compression test
- Verify engine oil level
Ignition System:
- Verify battery voltage
- Clean breaker points and set proper gap
- Verify auto advance functions freely
- Set ignition timing (statically, using a test light)
- Clean spark plugs and set proper gap
- Visually verify spark at the plugs
Fuel System:
- Drain all old fuel
- Replace all rubber lines
- Disassemble and clean/inspect carburetors
It was in the fuel system, specifically the carburetors, that age-related deterioration showed itself.
The floats in these old Hondas were fabricated from brass sheet and soft-soldered together. The float's function is to control the inlet valve in the carburetor. When the fuel level in the carb bowl drops, the float also drops with it, thus opening the inlet valve and allowing fuel into the bowl. The float then rises and closes the inlet valve when the fuel level reaches the proper height.
Here we can see the effects of surface corrosion on the floats. The brass is very thin originally and it doesn't take much for corrosion to cause perforation, allowing fuel to enter the float and negating its ability to actually float. The corroded areas pushed right through with the lightest touch of an X-acto knife. Needless to say, these parts were replaced with new, OEM parts (still available).
The bike started with no trouble and the idle speed and idle mixture were set once warmed up. The final step was to synchronize the throttles so that the slides lift at the same time.
Some other minor "repairs" had to be corrected, such as the brake light switch's attachment to the pedal (rusty wire won't do)...
...and the choke linkage (more rusty wire).
The air filter hardware was also replaced with the correct type. The little Honda runs like a champ and will no doubt continue to do so for quite a while longer.
Sunday, May 3, 2015
Ducati 749 15K Service
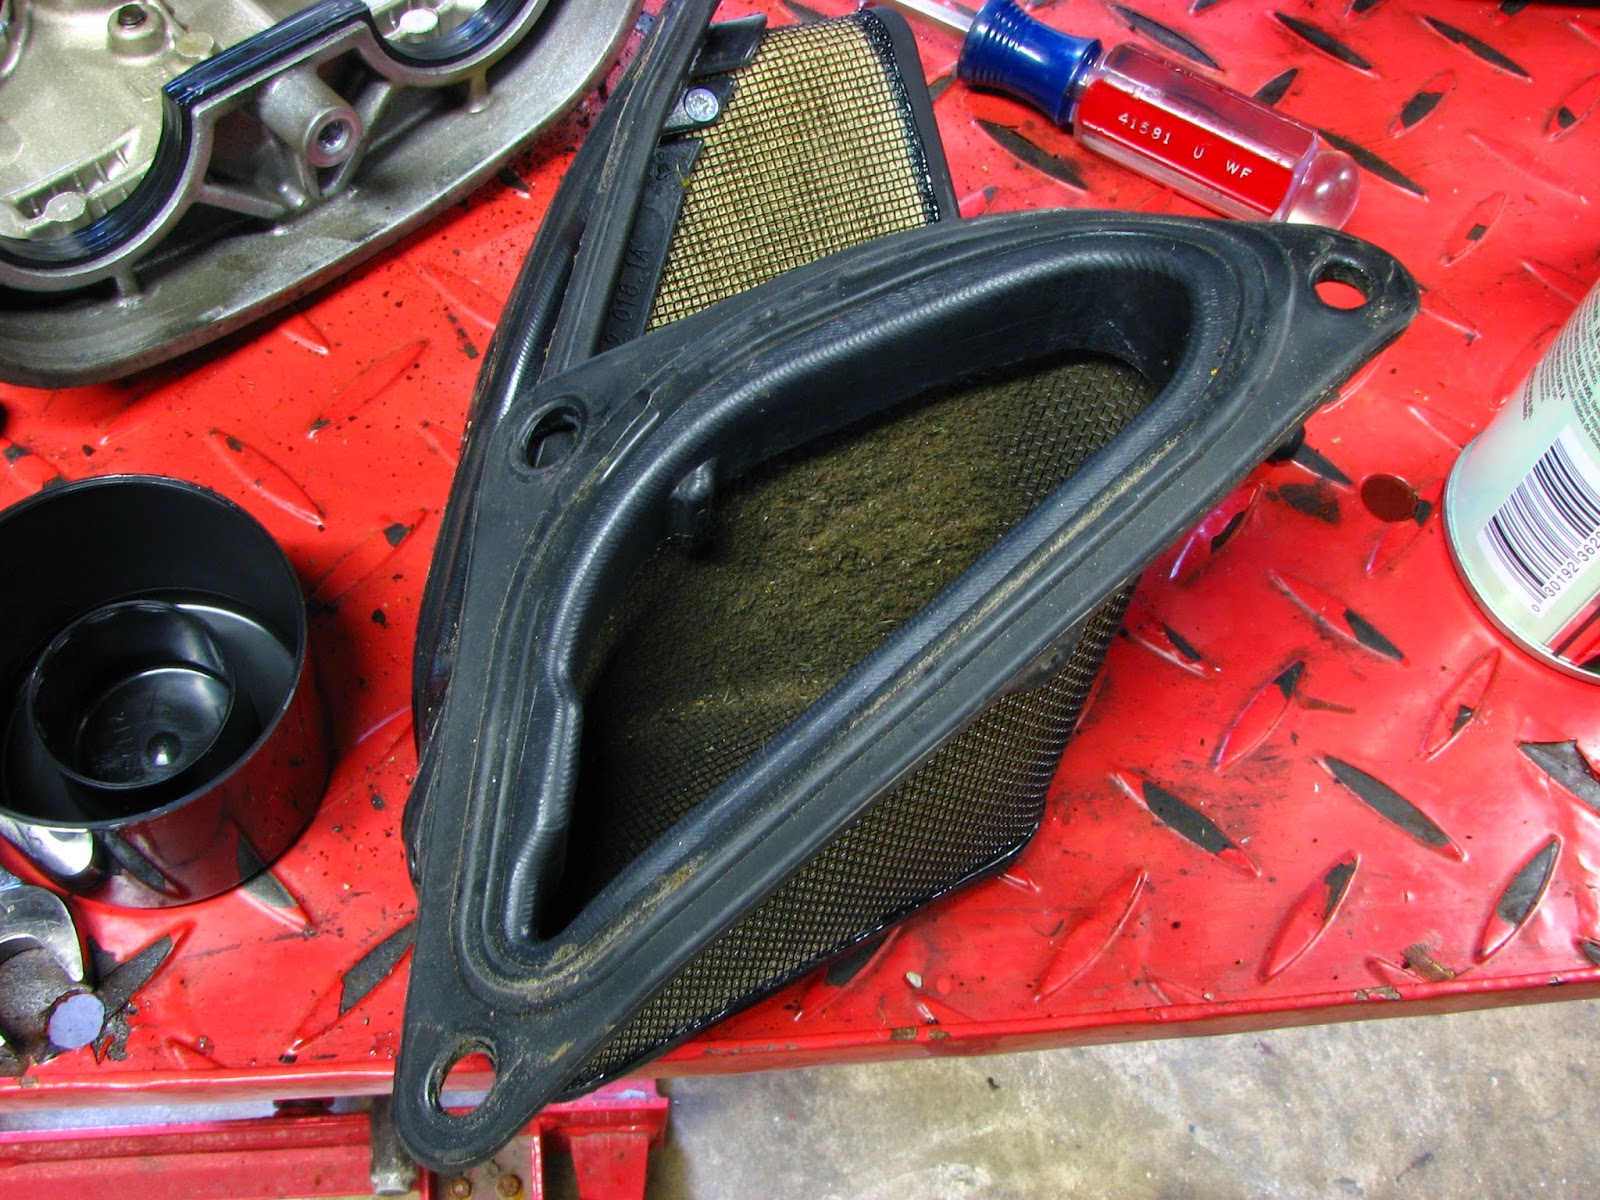
The air filters in the 749/999, by the nature of their design and that of the airbox, do not have a whole lot of surface area and tend to plug fairly quickly. The only option is frequent service which, although a bit of a hassle, isn't very costly since the factory air filters in these models are cleanable and reusable. Don't bother buying ANY aftermarket units for this model since you will only be buying what you already have, an oiled gauze filter element.
These filters had just about 15K miles of mixed road and trackday use.


This same bike also had some seriously excessive clearance on a couple of closer rockers. The factory specified clearance for a Testastretta is .002"-.010", with .002" being the preferred clearance.
Here we see .014" and .016" clearances.
If you own a Ducati Superbike and ride it the way it was made to be ridden, then scheduled service is a necessity, not an option.
These filters had just about 15K miles of mixed road and trackday use.
This same bike also had some seriously excessive clearance on a couple of closer rockers. The factory specified clearance for a Testastretta is .002"-.010", with .002" being the preferred clearance.
Here we see .014" and .016" clearances.
If you own a Ducati Superbike and ride it the way it was made to be ridden, then scheduled service is a necessity, not an option.
Friday, April 10, 2015
Monster S4R Major Service
Here's a really fun combination from the rider's viewpoint, the Desmoquattro engine in a Monster chassis. From a service standpoint, it's not so much fun. While the Monster lacks bodywork to deal with, it more than makes up for that fact by having every electrical component tightly packed around the engine and inside the frame. In a Superbike chassis these items are readily accessible (and removable) once the fairings are removed.


Thursday, April 9, 2015
ST3S Major Service
Here's an ST3 that's in for its 15K service. The bike was recently bought by its current owner but it had no service records. It's a 2006 model so it has the quiet, long-lived wet clutch in place of the damnable, noisy dry unit that "Ducatisti" are so fond of hearing. Personally, I prefer that a bike not sound like it's self-destructing, but that's just me. It's also an "S" model so it gets the (OEM) Öhlins shock along with ABS. I think that the ST2 and 3 were the best bikes that Ducati ever built and can't fathom Ducati's decision to discontinue the line. There are a couple of other things about this particular bike that I also can't fathom which I will detail presently.
Stripping the bodywork to access the engine....

Apparently, putting a dab of anti-seize on the fairing fasteners just takes too much time for the average flat-rate wrench-monkey, so we end up with fairing screws rusted to the wellnut inserts.
They either don't come out at all...
 ...or they tear the insert
 Obviously the wellnuts will all be replaced and the fairing screws will be lubed to prevent this in the future.
Then I lifted the tank and found this. A fine example of "tuning" using the advice of internet "knowledge" and a healthy dose of mechanical incompetence.

 If you're thinking that having the air filter loosely held in place with wire would allow dirty, unfiltered air to enter past the filter, you would be correct.
The internet forum experts continue to have no idea as to the actual function of the airbox in a modern motorcycle. This isn't some old POS American car in which the air cleaner housing can be removed for "free horsepower". The airbox of a modern bike is an integral part of the bike's intake system. Its volume and rigidity are engineered to produce a resonance that boosts intake pressure at a certain RPM. Removing the lid destroys that, as does removing the snorkels (which actually convert the incoming air's velocity into pressure) or cutting holes into the lid. Unless you've got a degree in fluid dynamics and can understand airflow behavior in an IC engine, DON'T assume that you can successfully second-guess the engineers that designed your bike (I'll save you the suspense, you can't).
As has been known forever, K&N filters DO flow more air than stock paper filters. How do you think they do that? It's no secret that the more open mesh that allows more airflow also provides LESS FILTRATION. Again, in the case of a modern bike, the OEM filter is not a restriction. The paper filter has much more surface area than a gauze filter (that's why it's pleated, cut one out and flatten it, you'll see just how big it really is) and it actually stops the dirt particulates that turn into grinding compound in your engine.
This is what was inside one of the intake trumpets...

Ducati did not leave you any "free horsepower" to be discovered by butchering your airbox or installing a less efficient filter. You are MUCH more likely to find a bit more power by correcting the factory's cam-timing errors than anything else.
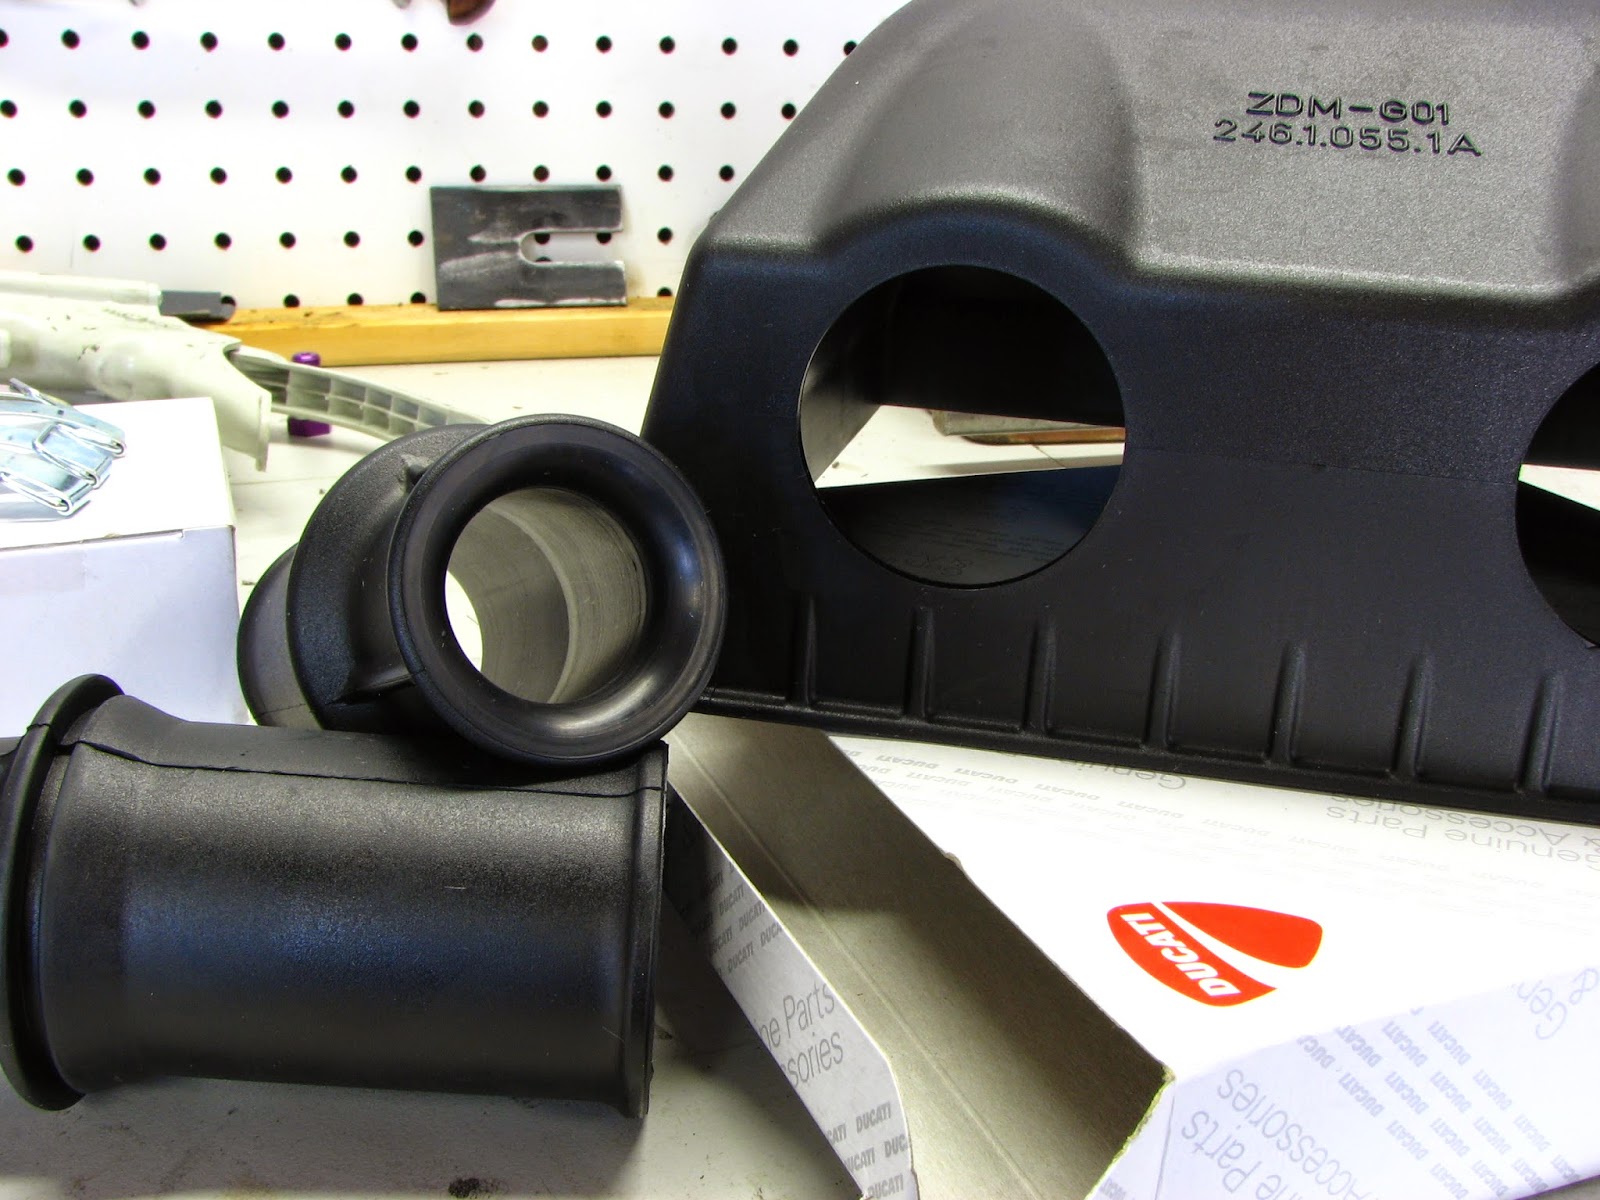
Here are the new airbox lid and intake snorkels, fresh from Italy. Notice the inside diameter of the intake snorkel compared to the size of the hole in the lid. If you think that the airbox will flow more air with the snorkels removed, you'd be wrong. Airflow does not like sharp edges. Notice the radius at the inlet side, this smoothly guides the incoming air into the even narrower throat, thus causing an increase in flow velocity, just like Mr. Bernoulli discovered it would.
It's at the outlet side of the snorkel that the air's velocity is converted into pressure, just as Mr. Venturi discovered. The outlet side is a gradual taper outward. This is known as a diffuser (not a de-fuser, that's somebody who works on the bomb-squad) and is designed to convert the velocity of the air in the venturi back into pressure with minimal energy loss.

Here is a comparison of the stock versus the K&N (crap) air filter elements. Notice how the paper air filter has many more pleats. This equals more surface area. Imagine pulling both filters out flat and you'll get an idea of just how much more. The stock air filter is not a restriction, it's surface area is calculated to provide sufficient air flow for the engine while maintaining better than adequate filtration. As I stated earlier, the K&N will flow more air, BUT will do so at the expense of filtration efficiency, and an otherwise stock engine has no need of more airflow.

Apparently, the valve clearances had never been serviced as they were ALL out of spec on both the openers and closers. Both exhaust valves had ZERO clearance on the openers. This is a dangerous condition since the exhaust valve depends upon full seat contact for not only sealing but more importantly, for heat transfer from the hot valve to the cylinder head where the coolant can carry the heat away.


Since any job that's worth doing is worth doing right, I always take the time to set the closer clearance to .001" to .002" on every Duc that comes into the shop for service. I also set the opener clearance to minimum end of the factory specification. This makes for a quiet valvetrain that does not depend upon the helper springs to close the valves at idle. Sometimes, in order to set the clearances with such precision the shims must be ground by hand to the proper size. On this job two closers and two openers had to be custom fit. I usually use a #2 cut file to get them close and hand lap to finish. Here is the setup for hand lapping the shims. It is a steel master flat surface plate with a thin coat of oil to hold the paper in place. The paper is lubricated with a couple drops of oil to create a slurry and it leaves a perfect finish on the face of the shim.

Here is the rear exhaust shim stack in place. Removing the cam bearing block and the opener rockers makes the job much easier than simply sliding the rockers to the side and doesn't take much more time.

With the valve clearances corrected and the new timing belts installed and correctly tensioned it's time to hook up the computer and test all electrical components relating to the engine (injectors, cooling fan, etc.), check for trouble codes, set the TPS and clear the service reminder.

With the engine warmed up the final operation is to change the engine oil and filter and check and clean the pickup screen. The pickup screen should never be neglected since it is the oil pump's first defense against particles that could damage it. This screen looked good but that cheap-o oil filter is a bad choice. OEM filters and Mobil-1 oil are the only items that I will use. The filter is pre-filled before installation. This greatly reduces the time that it takes the oil to reach the valvetrain after start up. As standard practice I safety the new filter with a hose clamp on all Ducati service.


Finally, the bike is detail washed, the bodywork is reinstalled and the bike is ready for another 15 thousand miles of trouble-free riding.
Stripping the bodywork to access the engine....
Apparently, putting a dab of anti-seize on the fairing fasteners just takes too much time for the average flat-rate wrench-monkey, so we end up with fairing screws rusted to the wellnut inserts.
They either don't come out at all...
Then I lifted the tank and found this. A fine example of "tuning" using the advice of internet "knowledge" and a healthy dose of mechanical incompetence.
The internet forum experts continue to have no idea as to the actual function of the airbox in a modern motorcycle. This isn't some old POS American car in which the air cleaner housing can be removed for "free horsepower". The airbox of a modern bike is an integral part of the bike's intake system. Its volume and rigidity are engineered to produce a resonance that boosts intake pressure at a certain RPM. Removing the lid destroys that, as does removing the snorkels (which actually convert the incoming air's velocity into pressure) or cutting holes into the lid. Unless you've got a degree in fluid dynamics and can understand airflow behavior in an IC engine, DON'T assume that you can successfully second-guess the engineers that designed your bike (I'll save you the suspense, you can't).
As has been known forever, K&N filters DO flow more air than stock paper filters. How do you think they do that? It's no secret that the more open mesh that allows more airflow also provides LESS FILTRATION. Again, in the case of a modern bike, the OEM filter is not a restriction. The paper filter has much more surface area than a gauze filter (that's why it's pleated, cut one out and flatten it, you'll see just how big it really is) and it actually stops the dirt particulates that turn into grinding compound in your engine.
This is what was inside one of the intake trumpets...
Ducati did not leave you any "free horsepower" to be discovered by butchering your airbox or installing a less efficient filter. You are MUCH more likely to find a bit more power by correcting the factory's cam-timing errors than anything else.
Here are the new airbox lid and intake snorkels, fresh from Italy. Notice the inside diameter of the intake snorkel compared to the size of the hole in the lid. If you think that the airbox will flow more air with the snorkels removed, you'd be wrong. Airflow does not like sharp edges. Notice the radius at the inlet side, this smoothly guides the incoming air into the even narrower throat, thus causing an increase in flow velocity, just like Mr. Bernoulli discovered it would.
It's at the outlet side of the snorkel that the air's velocity is converted into pressure, just as Mr. Venturi discovered. The outlet side is a gradual taper outward. This is known as a diffuser (not a de-fuser, that's somebody who works on the bomb-squad) and is designed to convert the velocity of the air in the venturi back into pressure with minimal energy loss.
Here is a comparison of the stock versus the K&N (crap) air filter elements. Notice how the paper air filter has many more pleats. This equals more surface area. Imagine pulling both filters out flat and you'll get an idea of just how much more. The stock air filter is not a restriction, it's surface area is calculated to provide sufficient air flow for the engine while maintaining better than adequate filtration. As I stated earlier, the K&N will flow more air, BUT will do so at the expense of filtration efficiency, and an otherwise stock engine has no need of more airflow.
Apparently, the valve clearances had never been serviced as they were ALL out of spec on both the openers and closers. Both exhaust valves had ZERO clearance on the openers. This is a dangerous condition since the exhaust valve depends upon full seat contact for not only sealing but more importantly, for heat transfer from the hot valve to the cylinder head where the coolant can carry the heat away.
Since any job that's worth doing is worth doing right, I always take the time to set the closer clearance to .001" to .002" on every Duc that comes into the shop for service. I also set the opener clearance to minimum end of the factory specification. This makes for a quiet valvetrain that does not depend upon the helper springs to close the valves at idle. Sometimes, in order to set the clearances with such precision the shims must be ground by hand to the proper size. On this job two closers and two openers had to be custom fit. I usually use a #2 cut file to get them close and hand lap to finish. Here is the setup for hand lapping the shims. It is a steel master flat surface plate with a thin coat of oil to hold the paper in place. The paper is lubricated with a couple drops of oil to create a slurry and it leaves a perfect finish on the face of the shim.
Here is the rear exhaust shim stack in place. Removing the cam bearing block and the opener rockers makes the job much easier than simply sliding the rockers to the side and doesn't take much more time.
With the valve clearances corrected and the new timing belts installed and correctly tensioned it's time to hook up the computer and test all electrical components relating to the engine (injectors, cooling fan, etc.), check for trouble codes, set the TPS and clear the service reminder.
With the engine warmed up the final operation is to change the engine oil and filter and check and clean the pickup screen. The pickup screen should never be neglected since it is the oil pump's first defense against particles that could damage it. This screen looked good but that cheap-o oil filter is a bad choice. OEM filters and Mobil-1 oil are the only items that I will use. The filter is pre-filled before installation. This greatly reduces the time that it takes the oil to reach the valvetrain after start up. As standard practice I safety the new filter with a hose clamp on all Ducati service.
Finally, the bike is detail washed, the bodywork is reinstalled and the bike is ready for another 15 thousand miles of trouble-free riding.
Tuesday, March 17, 2015
BMW R1100R 100-Thousand Mile Service
Here is an R100R that recently (4000 miles ago) had the clutch replaced at a local BMW dealership.
Apparently they missed a few things while it was apart and those items will be detailed here.
Keep in mind that until now the bike had always been serviced by the same dealership, at the factory recommended service intervals, which makes what I found all the more inexcusable.
This is the point to which the bike needs to be stripped to replace the clutch.

Starting from the final drive (which is the first component to be removed) we find that the outboard Paralever pivot bearing was seized which caused the inner race to destroy the pivot pin.

This is the outer race from the outboard side. Obviously both bearings and the outboard pivot will be replaced.

The final drive seal was also leaking and was replaced.


Moving up to the swingarm pivot we find that both swingarm pivot bearings are failed.

The above items are things that any competent mechanic should have checked and found during the course of the clutch replacement procedure.
Since the transmission is out of the bike and considering the mileage, the transmission was resealed and the clutch release bearing, spring and boot were replaced. BMW transmission seals do not rely on a shoulder to seat against, so they must be installed to their proper depth using a shouldered driver.
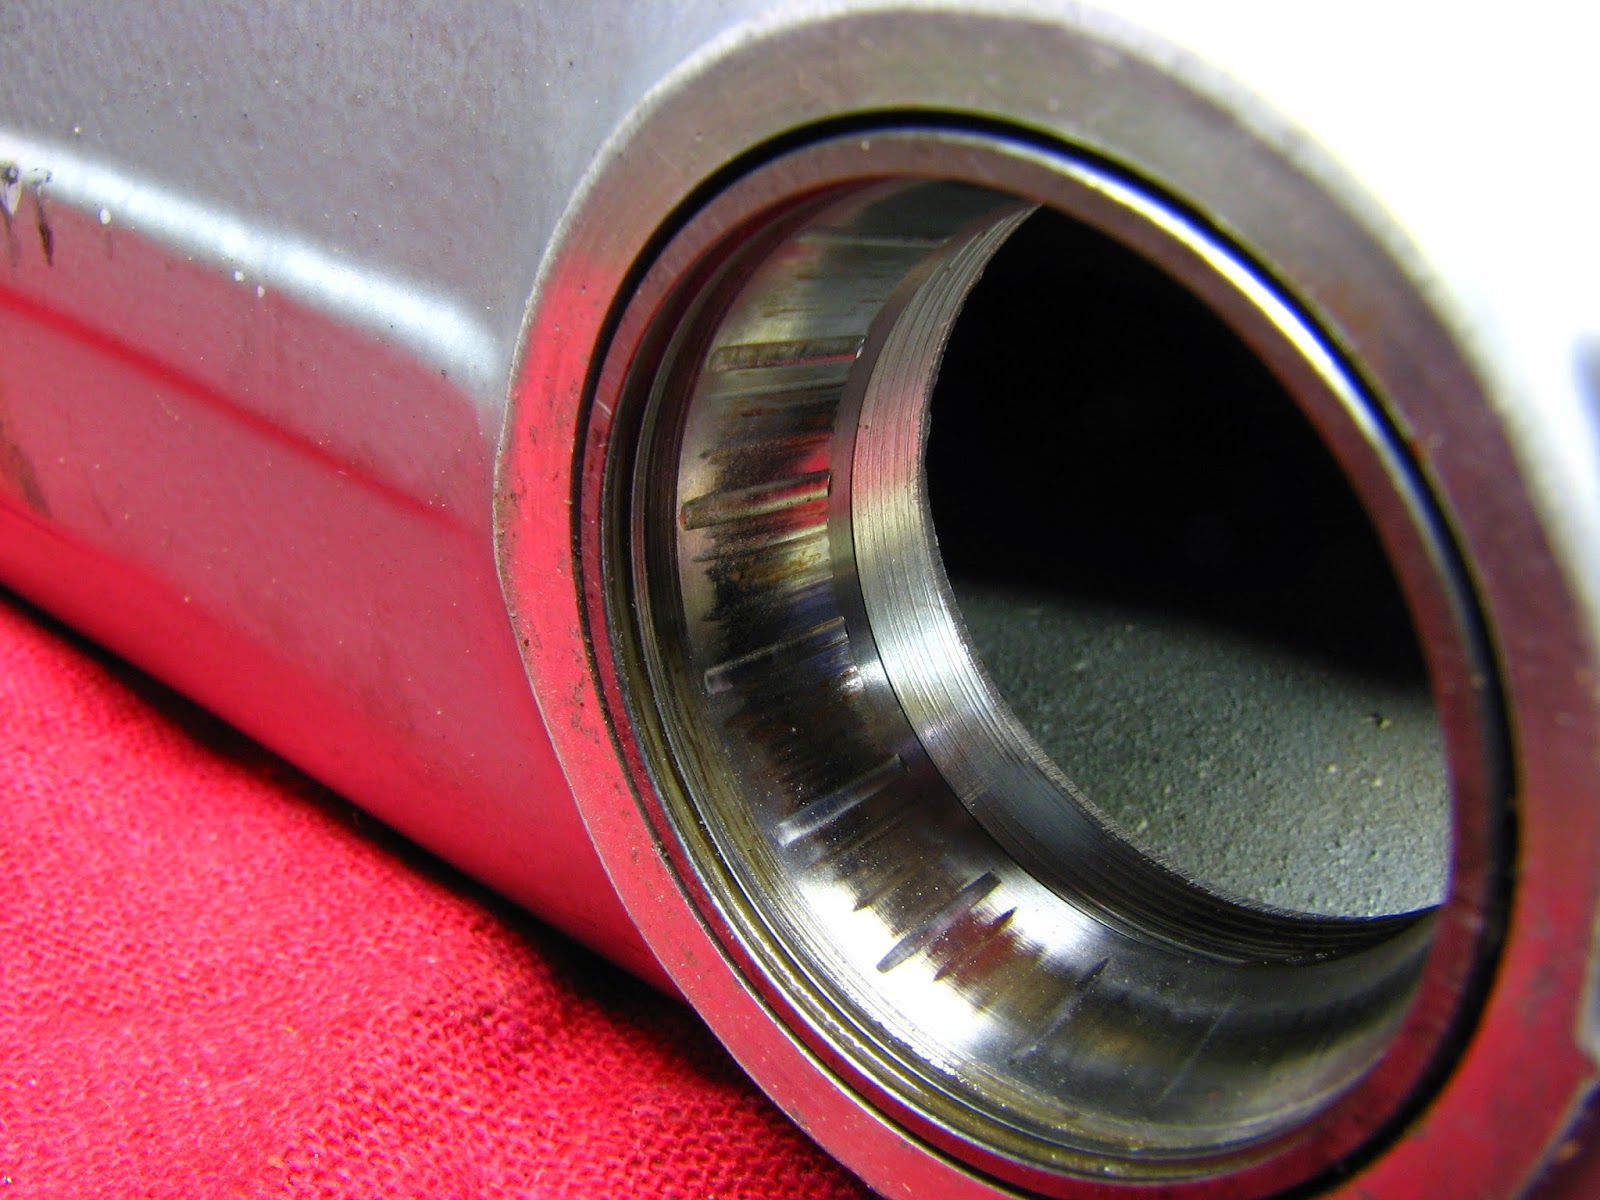
The input shaft, note the spline wear at 100K miles


Resealing the output shaft


All of the rubber parts will be replaced (right down to the battery strap) since they are subject to age-related deterioration. The bike is also getting a set of Wilber's shocks to replace the OEM dampers that are well past their best days.
Apparently they missed a few things while it was apart and those items will be detailed here.
Keep in mind that until now the bike had always been serviced by the same dealership, at the factory recommended service intervals, which makes what I found all the more inexcusable.
This is the point to which the bike needs to be stripped to replace the clutch.
Starting from the final drive (which is the first component to be removed) we find that the outboard Paralever pivot bearing was seized which caused the inner race to destroy the pivot pin.
This is the outer race from the outboard side. Obviously both bearings and the outboard pivot will be replaced.
The final drive seal was also leaking and was replaced.
Moving up to the swingarm pivot we find that both swingarm pivot bearings are failed.
The above items are things that any competent mechanic should have checked and found during the course of the clutch replacement procedure.
Since the transmission is out of the bike and considering the mileage, the transmission was resealed and the clutch release bearing, spring and boot were replaced. BMW transmission seals do not rely on a shoulder to seat against, so they must be installed to their proper depth using a shouldered driver.
The input shaft, note the spline wear at 100K miles
All of the rubber parts will be replaced (right down to the battery strap) since they are subject to age-related deterioration. The bike is also getting a set of Wilber's shocks to replace the OEM dampers that are well past their best days.
Subscribe to:
Posts (Atom)